Do you have questions we can help answer?
Do you have questions we can help answer?
Additional links:

© 2026 John Wood. All rights reserved.
For over 50 years, our water heaters have been providing hot water to homes and businesses.

What type of element do I require for my electric water heater?
The element in your water heater could be one of four types: strap-on, plug-in, bolt-on (square flange) and screw-in. The water heater element should be visually inspected to ensure you are selecting the correct element.
What are the differences between electric elements?
The strap-on elements are heating bands that wrap around the water heater. These elements have been replaced by more efficient immersion type elements and have not been used in the manufacturing of residential water heaters since the 1970’s. As a result, the elements are no longer being produced.
The plug-in elements are immersion-type elements and have a round flange that is held in place by a steel plate that bolts on to the water heater. A small rubber gasket (usually orange in colour) is used to seal the connection between the element and tank opening. These elements have not been used in manufacturing of water heaters since the mid 1980’s; however, limited selections of plug-in elements are available for replacement parts.
The bolt-on (square flange) elements are immersion-type elements and have thick steel flange that bolts to the water heater. A thick black rubber gasket and a flat gasket are used to seal the connection between the element and the tank opening. The bolt-on elements are still used on some models of water heaters and are widely available.
The screw-in elements are immersion-type elements and have a hex head flange (1 1/2″). The element screws into the water heater and has a thin gasket that is used to seal the connection between the element and the tank opening. Plumber’s tape or pipe dope should be applied to the element threads.
What are the effects of scale or lime formation on electric elements?
All water supplies contain varying quantities of impurities, with calcium and limestone being the most prominent. When water is heated, these minerals “fall out” of the water and are deposited on the interior surfaces of the tank as scale. The formation of scale increases with the temperature of the stored water. Scale forms on all surfaces including the element itself. The scale builds up an insulating layer which impedes the efficient transfer of heat which may allow the element to glow red hot in specific localities along its surface.
When this occurs, the scale that has built up on the element surface will flake off. When water comes back in contact with the hot element surface, the water will flash into steam. This alternate heating and cooling of the element shortens its life span. This process also creates a layer of debris at the bottom of the tank which can build to considerable depths, even to the point where the lower element is covered, affecting the proper operation of the tank.
How do I install an element?
IMPORTANT:
To avoid risk of electric shock, make sure the power is turned off and remains off until all repairs have been completed.
WARNING:
A water heater is capable of producing hot water at a temperature sufficient enough to cause scalding injury. Take proper precautions when draining a water heater to prevent scalding injury.
Read all instructions carefully before repairing a water heater.
What is the sequence of operation for a dual-element electric water heater?
When power is initially turned on to the unit, the upper element is energized and heats the water in the upper third of the tank.

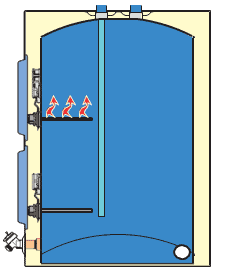
When the upper third of the tank is heated to the upper thermostat, power is switched to the lower heating element. The lower element continues to heat until the water temperature in the lower portion of the tank is heated to the lower thermostat setting.
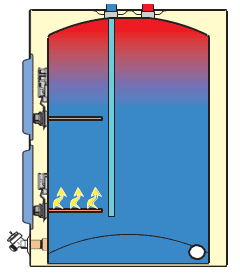

As hot water is drawn from the top of the tank the dip tube delivers cold water to the bottom of the tank.
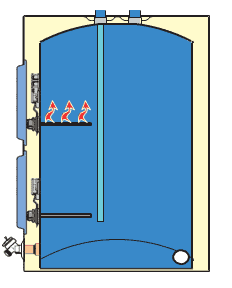

Eventually the cold water mixes with the hot, lowering the temperature below the thermostat setting and the bottom element is energized. If enough water is drawn to cool the upper-third of the tank, the upper thermostat will send power to the upper element first. When the upper-third of the tank is heated, power will again be switched to the lower element. If the upper element burns out, the water heater will cease to function because the upper thermostat will never be satisfied and power will never be switched to the lower element. If water temperature in the tank reaches 180°F, the manual reset hi-limit switch will be tripped. This switch can be reset by firmly pushing the red button above the upper thermostat.

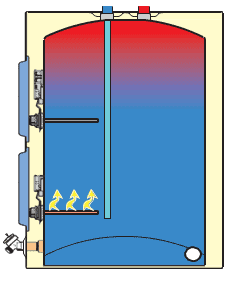
If enough water is drawn to cool the upper-third of the tank, the upper thermostat will send power to the upper element first. When the upper-third of the tank is heated, power will again be switched to the lower element. If the upper element burns out, the water heater will cease to function because the upper thermostat will never be satisfied and power will never be switched to the lower element. If water temperature in the tank reaches 180°F, the manual reset hi-limit switch will be tripped. This switch can be reset by firmly pushing the red button above the upper thermostat.
Single-element water heaters have one element mounted at the bottom of the tank controlled by a single thermostat and high limit switch.
How can I adjust the temperature on my electric water heater?
The water heater temperature is shipped with both thermostats factory preset at 140ºF, unless specified differently by federal or provincial regulations. The equipped adjustable thermostats on your water heater have a linear relationship between degrees of angular rotation and the corresponding change in temperature. Thus, rotating the temperature adjustment indicator 30 angular degrees will result in a 10ºF change in the water temperature.
Follow these steps when adjusting the temperature:
What are the steps to troubleshoot my electric water heater?

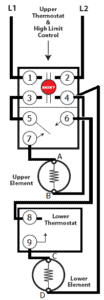
You will always have 240v between #1 and #4 on the hi-limit. 240v between screws “A” and “B” on the upper element when the tank is COLD. 240v between screws “C” and “D” on the lower element when the upper portion of the tank is HOT. When the tank is SATISFIED you will have 240v between screw #6 of the upper thermostat and #4 of the hi-limit but not power across the elements. With a short draw of hot water the lower thermostat will close and send the power to the opposite side of the element to heat up. If all voltages test OK, turn off the power to the water heater at the main electrical panel, remove wire from one side of each element, set the multimeter to “Ohms” and test the ohms reading of the elements.
If the ohms reading is too low or too high, change the element.
1200w @ 120v = 12.0 ohms
1500w @ 120v = 9.6 ohms
1500w @ 240v = 38.4 ohms
3000w @ 240v = 19.2 ohms
3800w @ 240v = 15.2 ohms
4500w @ 240v = 12.8 ohms
5500w @ 240v = 10.5 ohms
Why is my gas water heater condensing?
Condensate is the result of airborne water vapour being chilled below the dew point. The dew point is the temperature at which water vapour turns into liquid. Low incoming water temperatures cool the piping and the heat transfer surfaces of the water heater. When the main burner comes on, the hot flue gases turn into condensate upon contact with these surfaces. The typical home water heater will produce about one-half gallon of water vapour during every hour of operation. Condensate is often mistaken for leaking. Newer heaters will condensate more than older heaters because modern water heaters are much more efficient than their predecessors. The newer heaters utilize as much of the energy out of the main burner flame as possible. This lowers the flue gas and tank storage temperature and closer to the dew point temperature.
To distinguish between a condensing water heater and a leaking water heater:
1. Wipe up any water under the heater.
2. Turn the knob on the thermostat to the pilot position.
3. Wait 8 hours, check for water accumulation under the heater.
4. Condensation should stop when the entire tank of water is heated above approximately 115 degrees:
If no water is found under the heater, the water heater was condensing.
If water is found under the heater, check further for a loose fitting. If all fittings are tight and the tank is leaking, replace the water heater. Leaking heaters cannot be repaired.
My water is not hot enough
If the water coming out of your heater is not hot enough there could be a few different issues. Some of these will require work to be done by a certified HVAC technician.
The temperature fluctuates when a fixture is opened.
If the water temperature fluctuates while the water is running there are a few possible issues.
The heater has power, gas and water but doesn’t turn on.
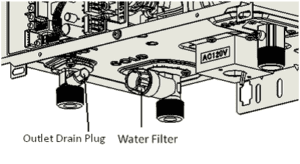
If the heater was just installed it may have been installed incorrectly. If this is not the case there may be an issue with the flow sensor, which will require a certified HVAC technician. Alternately, the filter may need to be cleaned.
To clean the filter, the unit must first be drained:

It takes a long time to get hot water at the fixtures.
It is common that a tankless unit will require more time for hot water to arrive at the faucet. The time it takes to deliver hot water to your fixtures depends on the length of piping between the two. The longer the distance or the bigger the pipes, the longer it will take to get hot water. If this is the case and you would like to receive hot water to your fixtures quicker, you may want to consider a hot water recirculation system. If you already have a recirculation system there may be an issue with it and you should contact a certified HVAC technician.
What does it mean if my water smells bad?
The most common cause of smelly water is a bacteria that is already present in water, but grows rapidly when kept in a warm water environment such as water heaters or hot water storage tanks. This bacteria reduces sulfates that are also contained in the water to a point where they are converted into sulfides. Sulfides, when mixed with hydrogen produce an unpleasant rotten egg odor called hydrogen sulfide gas. Sometimes, hydrogen is already present in the water and is increased by the anode rod(s) found in your water heater.
Permanently removing the anode rod(s) is not a suggested remedy as this will void your tank warranty.
A solution for this problem is to chlorinate your water heater or hot water storage tank. A chlorine feeder may be the only permanent solution to iron or sulfur bacteria infestation. You can also try changing the anode rod from magnesium to aluminum.
What does it mean if my water is rusty?
This problem will rarely occur as a result of a water heater or storage tank. Rusty coloured water is caused by the water coming in contact with bare metal. In order for this to happen, a lining failure would have to be so significant that it would allow the water to come in contact with enough bare metal to discolour the contents of even a small tank. Fortunately, with today’s high quality glass-lined tanks, this is a very rare occurrence. Instead, the common cause of rusty coloured water is bacteria that reduces the iron found in water. This bacteria is found in soil, water wells, water treatment plants and water distribution piping systems. The bacteria feeds off this soluble iron and, if not treated and allowed to flourish, will result in stained laundry, tablewear and plumbing fixtures. If this bacteria exists in your heater or tank, you may require new anode rod(s), as they will fail prematurely in these conditions. To solve this chlorinate your water heater or hot water storage tank.
What does is mean if my water looks milky or cloudy?
Gases such as oxygen, chlorine, carbon dioxide, hydrogen sulfide, and others are soluble in water. As the pressure increases, the amount of gas that water can hold in a solution decreases which cause the cloudy effect. “Milky” water caused by dissolved gasses can be greatly reduced with aerated faucets
Is having a water softener harmful to my water heater?
The use of water softeners in hard water areas and even moderately soft water areas is becoming a common occurrence. This practice has a potentially detrimental effect on the performance of the anode in the water heater which can cause a reduction in the life of the water heater. Customers using water softeners should expect more rapid anode consumption. Anodes should be inspected more often and replaced when nearing the end of their useful life.
How do I drain and flush my water heater and how often should I do it?
It is recommended that the tank be drained and flushed every 6 months to remove sediment which may buildup during operation. The water heater should be drained if being shut down for extended periods of time.
GAS-FIRED WATER HEATER:
To drain the tank, perform the following steps:
ELECTRIC WATER HEATER:
NOTE: Make sure power is turned off in the case of electric heaters. Electric elements will burn out if they are operated in a dry tank.
Turn off water supply.
How do I complete cathodic protection and inspection for anode rods?
Glass-lined water heaters are supplied with sacrificial magnesium anode rods that protect the interior of the tank through cathodic action. As the rod works, it slowly dissolves over time and must be replaced when it is totally consumed.
ANODE ROD INSPECTION INSTRUCTIONS:
How do I complete a chlorination procedure?
How to clean the wrap-around filter and flame arrestor on a FVIR water heater.
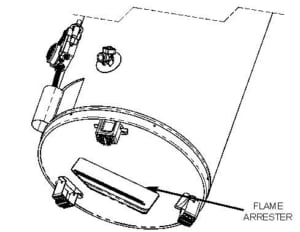
If an inspection of the filter shows a build-up of dirt or debris on the filter, it should be cleaned. The filter can be vacuumed to remove the build-up. Visually inspect the flame arrester by placing a mirror underneath the water heater. A flashlight can be used to illuminate the slots in the flame arrester if necessary. Routine cleaning of the flame arrester is recommended if the inspection shows accumulation of debris on the flame arrester.
Use a vacuum cleaner to remove all loose debris in the flame arrester. If necessary, a soft bristle brush can be used to dislodge any remaining debris.

How do I change a dip tube?
How old is my water heater and is it still under warranty? How to read a John Wood serial number.
John Wood serial numbers contain a lot of information, including when the heater was manufactured. This can be determined by looking at the first four numbers, ignoring any letter that may start the serial number. The first two numbers represent the year the heater was built. If your heater was built before 2008, the next two numbers represent the month. If your heater was built after 2008, the next two numbers represent the week.
For Example
Serial number: U0106413635
This heater was manufactured in June 2001
To see if your water is still under warranty click here to go to our warranty validation page.
Please note that warranties are based on use in residential applications.
Reduced warranty for commercial applications.
Should I use a water heater insulation blanket?
Insulation blankets available to the general public for external use on gas water heaters are not necessary with John Wood products. The purpose of an insulation blanket is to reduce the standby heat loss encountered with storage tank heaters. John Wood water heaters meet or exceed the National Appliance Energy Conservation Act standards with respect to insulation and standby loss requirements, making an insulation blanket unnecessary.
I have more than one water heater. What is the best way to pipe them?
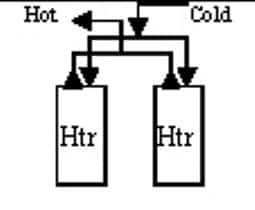
Piping in series can cause the first heater to fail sooner than the second as you are using the full capacity of the first heater and only upon an increased demand, is the second heater cycled on. The better choice is to pipe in parallel which allows you to use both heaters equally. It allows the system to act as one heater rather than independent. By drawing hot water out of both heaters equally, you are able to equalize the life of your heaters.

Why is my new water heater making noises such as crackling, gurgling or popping?
These noises are an indication of scale build-up that you will need to remove. The task can prove to be relatively easy if you follow the steps to complete the process properly.
Why is my T&P valve dripping water? Diagnosing and fixing thermal expansion.
The most common reason a T&P valve is dripping water is thermal expansion. The water in a water heating system expands when it is heated and has a greater volume.
Follow these easy steps to diagnose thermal expansion:
WARNING: Thermal expansion of water, if not compensated for in system design, will lead to the early failure of components. These failures are not covered by the manufacturer’s warranty, so it is extremely important that everyone be aware of the causes, symptoms and solutions to thermal expansion in a closed water heating system.
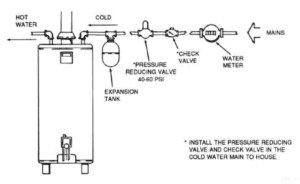
How to install a pressure-reducing valve and expansion tank.
The ideal fix involves the use of a pressure reducing valve, if supply pressures are above 60 to 70 psi, and a properly sized expansion tank.
DO NOT DEPEND ON THE T&P VALVE TO HANDLE THERMAL EXPANSION! The T&P valve, according to the makers of those valves, was designed as an emergency relief device only. The T&P could be subject to reduced effectiveness or failure.

I found a puddle of water around my water heater. What happened?
Water accumulating on the floor or in the drain pan is generally caused by one of the following conditions:
CONDENSATION: Condensation should only be noticeable after a long draw of hot water. Once the temperature of the tank is above 110oF, condensation should stop.
DRAIN VALVE LEAKING: Check to see if the heater drain valve is closed tightly. If the leakage cannot be stopped by the handwheel, replace the drain valve.
TEMPERATURE AND PRESSURE RELIEF VALVE LEAKING: If the leakage is from temperature and pressure relief valve or its discharge pipe, it may represent relief valve activation. The relief valve relieves water slowly when actuating on pressure. A closed system can cause pressure to increase in the system. This condition is called thermal expansion. The incoming water pressure should also be checked and compared with the valve’s rating. If the supply water pressure is higher than the valve’s rating, a pressure reducing valve will be needed.
LEAK FROM PIPING ON AND NEAR THE INLET AND OUTLET: In warm or humid locations, condensation can accumulate and run down flue tubes, cold water supply pipe, and heater connections. Check connections and fitting for possible leaks.
LEAK AT GAS VALVE THREADED CONNECTION (GAS MODELS ONLY): Remove valve and reapply pipe joint compound.
LEAK FROM GASKETS FOR ELECTRIC ELEMENTS (ELECTRIC MODELS ONLY): These gaskets can be replaced. The element threads may need to be resealed.
Why do I hear the pipes bang, thump or vibrate when I turn off the water at my sink faucet or when I run my dishwasher/washing machine?
This is referred to as “water hammer”. Water hammer occurs in a piping system when water flowing through a pipeline is stopped abruptly. When water hammer occurs, a high intensity pressure wave travels back through the piping system until it reaches a point of some relief. The shock wave will then surge back and forth between the point of relief and the point of stoppage until the destructive energy is dissipated in the piping system. The violent action accounts for banging, thumping, and/or intense vibration in the pipeline. Although noise is generally associated with the occurrence of water hammer, it can occur without audible sound or noise. Quick closure always causes some degree of shock with or without noise. The common cause of water hammer is single lever faucets (sinks/lavatories) or automatic solenoid valves (dishwashers, washing machines, etc.). The speed of the valve closure time is directly related to the intensity of the surge pressure.
The only effective means of control is to install water hammer arrestors. These devices have diaphragms which separate an air chamber from the water in the piping system. As the shock wave reaches this device, the air chamber absorbs the shock. Arrestors should be located as close as possible to the source of the shock wave.
What are heat trap fittings?
Heat traps are installed on some residential water heaters to comply with the many utility incentive programs, and certain new construction or replacement product requirements in place throughout the country. Devices such as impulse sprinklers and water pumps can cause the pulsating. The noise is sometimes conducted through piping and framing of the house annoying the occupants.
Since there is no simple way to correct pulsation of the water supply, removal of the heat traps is sometimes the only practical alternative. The heat traps may be removed from the heater without affecting the safe operation of the heater.
The removal of the heat traps will cause a small reduction in the overall efficiency of the water heater.
How do I install a drain valve?
The installation of a drain valve generally requires the draining of the tank. Make sure power is turned off in the case of electric heaters, or the gas control is turned to PILOT in the case of gas heaters. Electric elements will burn out if they are operated in a dry tank, and damage will occur if the gas burner comes on with a gas heater which is not filled with water.
How do I determine the proper sized water heater for my application?
Water heaters can often fail prematurely due to improper sizing. The storage capacities as well as the recovery rate are both important factors when sizing a water heating system. Improper sizing can also lead to complaints of not enough hot water. It is important to consider not only the volume of water required, but the temperature that is required. When a large volume of water is needed within a small amount of time, this water is generally supplied from storage. This volume is referred to as the dump load. When choosing the appropriate storage tank size, the actual and usable storage will need to be addressed. If water is required at a certain gallon per minute rate, this water will generally be supplied by the recovery of heater. Keep in mind that any dump loads also need to be included in this recovery.
Some signs of an undersized water heater are:
When a water heater is properly sized, some condensation will occur. However, excessive condensation is not normal and will corrode the heater.
How old is my water heater and is it still under warranty? How to read a John Wood serial number.
John Wood serial numbers contain a lot of information, including when the heater was manufactured. This can be determined by looking at the first four numbers, ignoring any letter that may start the serial number. The first two numbers represent the year the heater was built. If your heater was built before 2008, the next two numbers represent the month. If your heater was built after 2008, the next two numbers represent the week.
For Example
Serial number: U0106413635
This heater was manufactured in June 2001
To see if your water is still under warranty click here to go to our warranty validation page.
Please note that warranties are based on use in residential applications.
Reduced warranty for commercial applications.
Why is my T&P valve dripping water? Diagnosing and fixing thermal expansion.
The most common reason a T&P valve is dripping water is thermal expansion. The water in a water heating system expands when it is heated and has a greater volume.
Follow these easy steps to diagnose thermal expansion:
WARNING: Thermal expansion of water, if not compensated for in system design, will lead to the early failure of components. These failures are not covered by the manufacturer’s warranty, so it is extremely important that everyone be aware of the causes, symptoms and solutions to thermal expansion in a closed water heating system.
How to install a pressure-reducing valve and expansion tank.
The ideal fix involves the use of a pressure reducing valve, if supply pressures are above 60 to 70 psi, and a properly sized expansion tank.
DO NOT DEPEND ON THE T&P VALVE TO HANDLE THERMAL EXPANSION! The T&P valve, according to the makers of those valves, was designed as an emergency relief device only. The T&P could be subject to reduced effectiveness or failure.
I found a puddle of water around my water heater. What happened?
Water accumulating on the floor or in the drain pan is generally caused by one of the following conditions:
CONDENSATION: Condensation should only be noticeable after a long draw of hot water. Once the temperature of the tank is above 110oF, condensation should stop.
DRAIN VALVE LEAKING: Check to see if the heater drain valve is closed tightly. If the leakage cannot be stopped by the handwheel, replace the drain valve.
TEMPERATURE AND PRESSURE RELIEF VALVE LEAKING: If the leakage is from temperature and pressure relief valve or its discharge pipe, it may represent relief valve activation. The relief valve relieves water slowly when actuating on pressure. A closed system can cause pressure to increase in the system. This condition is called thermal expansion. The incoming water pressure should also be checked and compared with the valve’s rating. If the supply water pressure is higher than the valve’s rating, a pressure reducing valve will be needed.
LEAK FROM PIPING ON AND NEAR THE INLET AND OUTLET: In warm or humid locations, condensation can accumulate and run down flue tubes, cold water supply pipe, and heater connections. Check connections and fitting for possible leaks.
LEAK AT GAS VALVE THREADED CONNECTION (GAS MODELS ONLY): Remove valve and reapply pipe joint compound.
LEAK FROM GASKETS FOR ELECTRIC ELEMENTS (ELECTRIC MODELS ONLY): These gaskets can be replaced. The element threads may need to be resealed.
How do I determine the proper sized water heater for my application?
Water heaters can often fail prematurely due to improper sizing. The storage capacities as well as the recovery rate are both important factors when sizing a water heating system. Improper sizing can also lead to complaints of not enough hot water. It is important to consider not only the volume of water required, but the temperature that is required. When a large volume of water is needed within a small amount of time, this water is generally supplied from storage. This volume is referred to as the dump load. When choosing the appropriate storage tank size, the actual and usable storage will need to be addressed. If water is required at a certain gallon per minute rate, this water will generally be supplied by the recovery of heater. Keep in mind that any dump loads also need to be included in this recovery.
Some signs of an undersized water heater are:
When a water heater is properly sized, some condensation will occur. However, excessive condensation is not normal and will corrode the heater.
What does it mean if my water smells bad?
The most common cause of smelly water is a bacteria that is already present in water, but grows rapidly when kept in a warm water environment such as water heaters or hot water storage tanks. This bacteria reduces sulfates that are also contained in the water to a point where they are converted into sulfides. Sulfides, when mixed with hydrogen produce an unpleasant rotten egg odor called hydrogen sulfide gas. Sometimes, hydrogen is already present in the water and is increased by the anode rod(s) found in your water heater.
Permanently removing the anode rod(s) is not a suggested remedy as this will void your tank warranty.
A solution for this problem is to chlorinate your water heater or hot water storage tank. A chlorine feeder may be the only permanent solution to iron or sulfur bacteria infestation. You can also try changing the anode rod from magnesium to aluminum.
Is having a water softener harmful to my water heater?
The use of water softeners in hard water areas and even moderately soft water areas is becoming a common occurrence. This practice has a potentially detrimental effect on the performance of the anode in the water heater which can cause a reduction in the life of the water heater. Customers using water softeners should expect more rapid anode consumption. Anodes should be inspected more often and replaced when nearing the end of their useful life.
Why do I hear the pipes bang, thump or vibrate when I turn off the water at my sink faucet or when I run my dishwasher/washing machine?
This is referred to as “water hammer”. Water hammer occurs in a piping system when water flowing through a pipeline is stopped abruptly. When water hammer occurs, a high intensity pressure wave travels back through the piping system until it reaches a point of some relief. The shock wave will then surge back and forth between the point of relief and the point of stoppage until the destructive energy is dissipated in the piping system. The violent action accounts for banging, thumping, and/or intense vibration in the pipeline. Although noise is generally associated with the occurrence of water hammer, it can occur without audible sound or noise. Quick closure always causes some degree of shock with or without noise. The common cause of water hammer is single lever faucets (sinks/lavatories) or automatic solenoid valves (dishwashers, washing machines, etc.). The speed of the valve closure time is directly related to the intensity of the surge pressure.
The only effective means of control is to install water hammer arrestors. These devices have diaphragms which separate an air chamber from the water in the piping system. As the shock wave reaches this device, the air chamber absorbs the shock. Arrestors should be located as close as possible to the source of the shock wave.
Why is my gas water heater condensing?
Condensate is the result of airborne water vapour being chilled below the dew point. The dew point is the temperature at which water vapour turns into liquid. Low incoming water temperatures cool the piping and the heat transfer surfaces of the water heater. When the main burner comes on, the hot flue gases turn into condensate upon contact with these surfaces. The typical home water heater will produce about one-half gallon of water vapour during every hour of operation. Condensate is often mistaken for leaking. Newer heaters will condensate more than older heaters because modern water heaters are much more efficient than their predecessors. The newer heaters utilize as much of the energy out of the main burner flame as possible. This lowers the flue gas and tank storage temperature and closer to the dew point temperature.
To distinguish between a condensing water heater and a leaking water heater:
1. Wipe up any water under the heater.
2. Turn the knob on the thermostat to the pilot position.
3. Wait 8 hours, check for water accumulation under the heater.
4. Condensation should stop when the entire tank of water is heated above approximately 115 degrees
If no water is found under the heater, the water heater was condensing.
If water is found under the heater, check further for a loose fitting. If all fittings are tight and the tank is leaking, replace the water heater. Leaking heaters cannot be repaired.
How do I drain and flush my water heater and how often should I do it?
It is recommended that the tank be drained and flushed every 6 months to remove sediment which may buildup during operation. The water heater should be drained if being shut down for extended periods of time.
GAS-FIRED WATER HEATER:
To drain the tank, perform the following steps:
ELECTRIC WATER HEATER:
NOTE: Make sure power is turned off in the case of electric heaters. Electric elements will burn out if they are operated in a dry tank.
Turn off water supply.
What type of element do I require for my electric water heater?
The element in your water heater could be one of four types: strap-on, plug-in, bolt-on (square flange) and screw-in. The water heater element should be visually inspected to ensure you are selecting the correct element.
© 2026 John Wood. All rights reserved.
For over 50 years, our water heaters have been providing hot water to homes and businesses.